The chatbot market value is projected to grow by USD 1.73 billion during the 2021 - 2025. So, as a developer, if you haven't already built one, you might need to. Soon.
Given the diverse landscape of digital channels, the importance of centrally managing your identity across your digital platforms is key!
Lucky for us we have many IDaaS (identity as a service) solutions to choose from Microsoft, Ping Or Okta (they're all good).
Today we'll look at how you can protect your Azure Bot Service with identity powered by Okta.
What are we doing today?
- Let's start with some basics.
- Pre-requisites before we start.
- A cheat sheet to help us!
- Protect our bot service with identity powered by Okta
Let's start with some basics
What is a bot?
A web service that responds to different requests using a pre-determined format.
What is the Azure Bot Service?
The Azure Bot Service allows you to seamlessly connect your bot application to your users via popular channels.
Essentially, think of the Azure Bot Service as a mechanism of:
- configuring the location/url of where your bot application is actually running
- configuring identity within your bot application
- seamlessly exposing your bot to multiple channels like:
- Alexa
- Line
- Twilio
- Web-Ex
- Google Hangouts and Google Assistant
- Microsoft Teams
- Slack
- Webchat ... and many more!
Pre-requisites before we start
Before we get started, here are a list of Applications, developer tools, frameworks and cloud services that we need to get things working.
Apps and other dev tools:
- git
- Visual Studio Code (https://code.visualstudio.com/)
- Bot Framework Emulator (https://github.com/Microsoft/BotFramework-Emulator/blob/master/README.md)
- ngrok (https://ngrok.com/)
Frameworks:
- dotnet core 3 (https://dotnet.microsoft.com/download/dotnet)
Cloud Services:
You will need access to an Azure account and the ability to create cloud services. Everything we discuss today can be done with free Azure services so no need to stress.
- We will create an Azure Bot Service
- And an App Registration within Azure Active Directory
Apart from Azure, you also need access to an Okta tenant. If you don't have one, you can create one for free as shown here.
A cheat-sheet to help us!
As we get things working, we will need to gather details across multiple cloud services, generate some application secrets & configure them in the codebase.
To make life easier, here is a cheat-sheet that we will use as we progress through the different steps.
I recommend that you copy the items below onto a notepad that you can reference as we proceed through the steps.
(A) Bot Framework Base Settings:
1. Bot Name: <YOU-DECIDE>
2. Login URI: https://token.botframework.com/.auth/web/redirect
3. Bot oAuth Connection Settings Name: <YOU-DECIDE>
(B) Azure Bot Settings:
1. Microsoft App Id: <TO-BE-GENERATED>
2. Microsoft App Password: <TO-BE-GENERATED>
(C) Okta Authorization Server Settings:
1. Auth Server Issuer Url: <FROM-OKTA>
2. Authorization URL : <FROM-OKTA>/v1/authorize
3. Token URL : <FROM-OKTA>/v1/token
4. Refresh URL : <FROM-OKTA>/v1/token
5. Scopes : openid,profile,email,offline_access
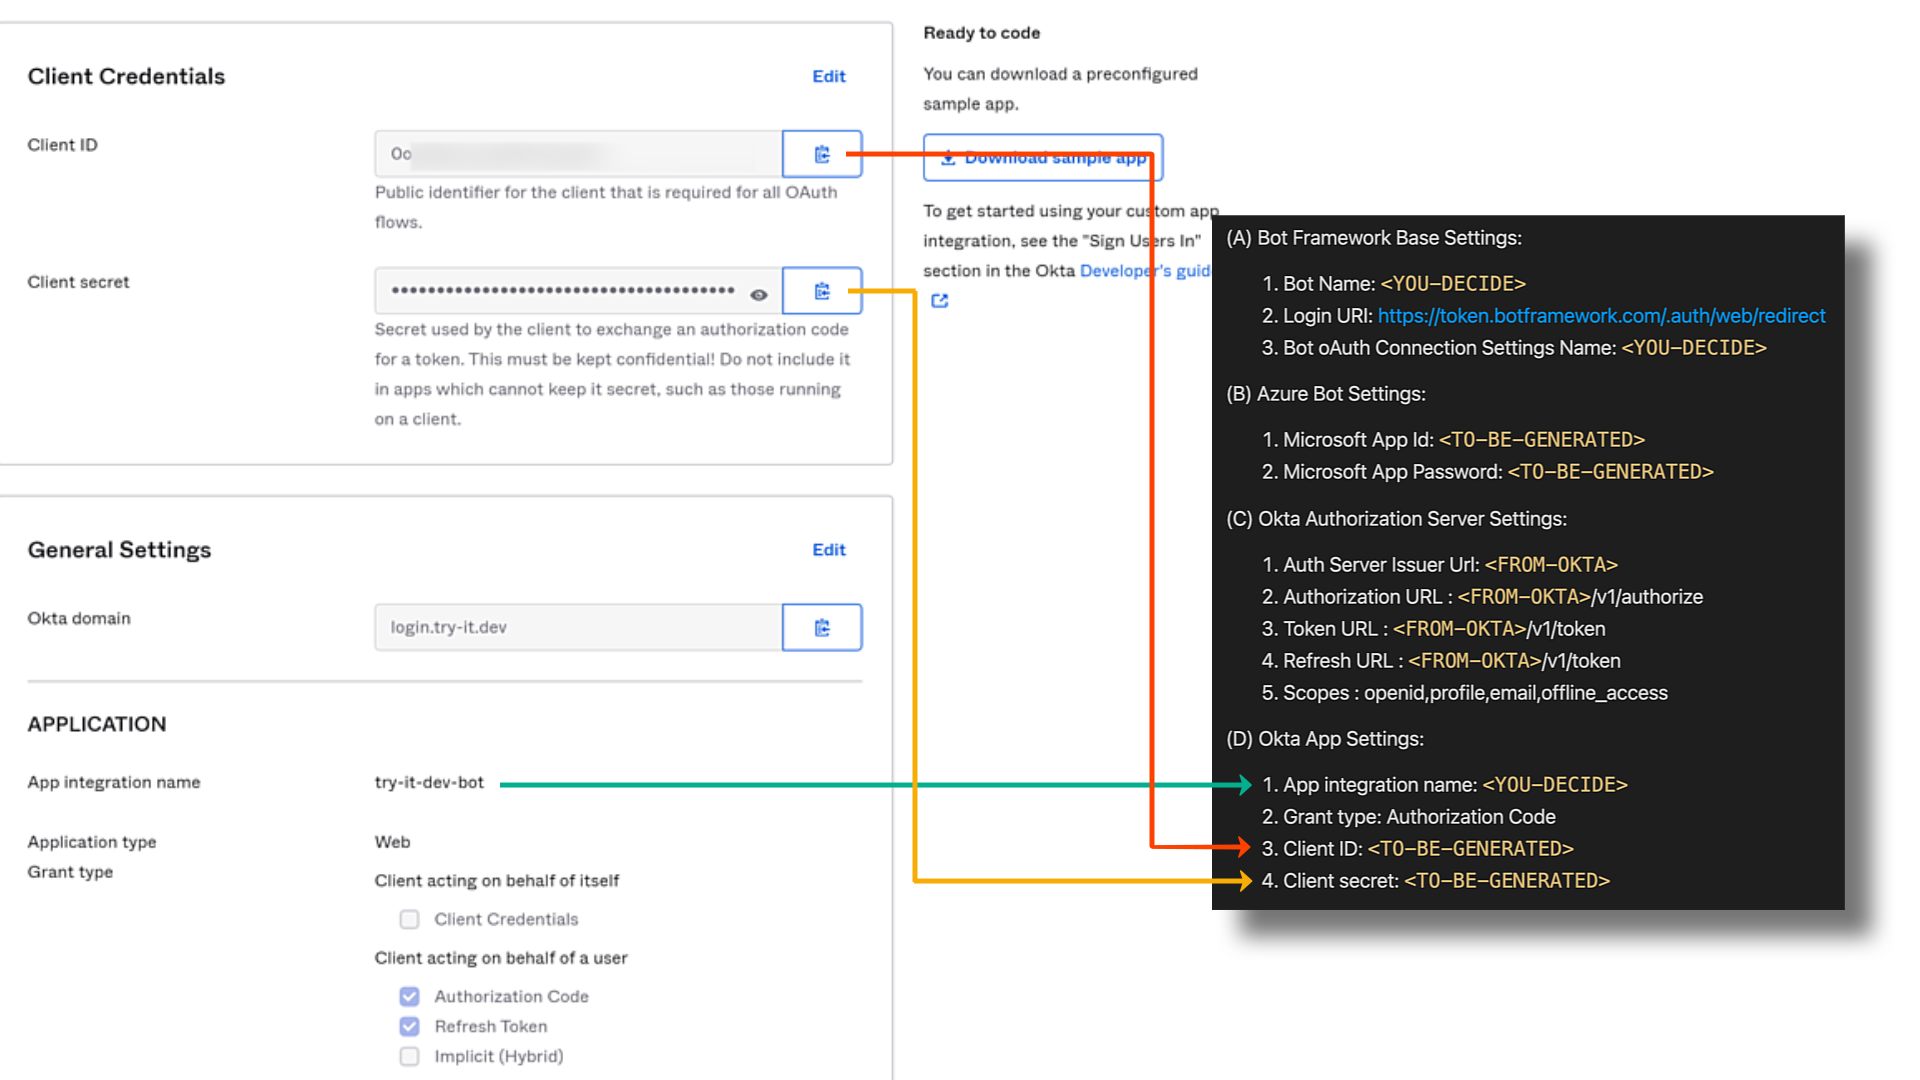
(D) Okta App Settings:
1. App integration name: <YOU-DECIDE>
2. Grant type: Authorization Code
3. Client ID: <TO-BE-GENERATED>
4. Client secret: <TO-BE-GENERATED>
(E) ngrok Settings:
1. App URL: <TO-BE-GENERATED>/api/messages
Protect our bot service with identity powered by Okta
1. Starting with some sample code
To make the most of the Azure Bot Service, we can start with sample code provided by Microsoft at https://github.com/microsoft/BotBuilder-Samples#readme.

Clone this repo to get more than 80+ bot samples.
git clone https://github.com/microsoft/BotBuilder-Samples.git
cd BotBuilder-Samples
The one we really care about are the within the authentication samples called "OAuth authentication". In this post we'll use the .net core sample at https://github.com/microsoft/BotBuilder-Samples/tree/main/samples/csharp_dotnetcore/18.bot-authentication.
For now, navigate to the "OAuth Authentication" project, build it and open the source in vscode.
 cd samples/csharp_dotnetcore/18.bot-authentication
 dotnet build
 code .
To get our code sample to work, we need to add these 3 values to the appsettings.json:
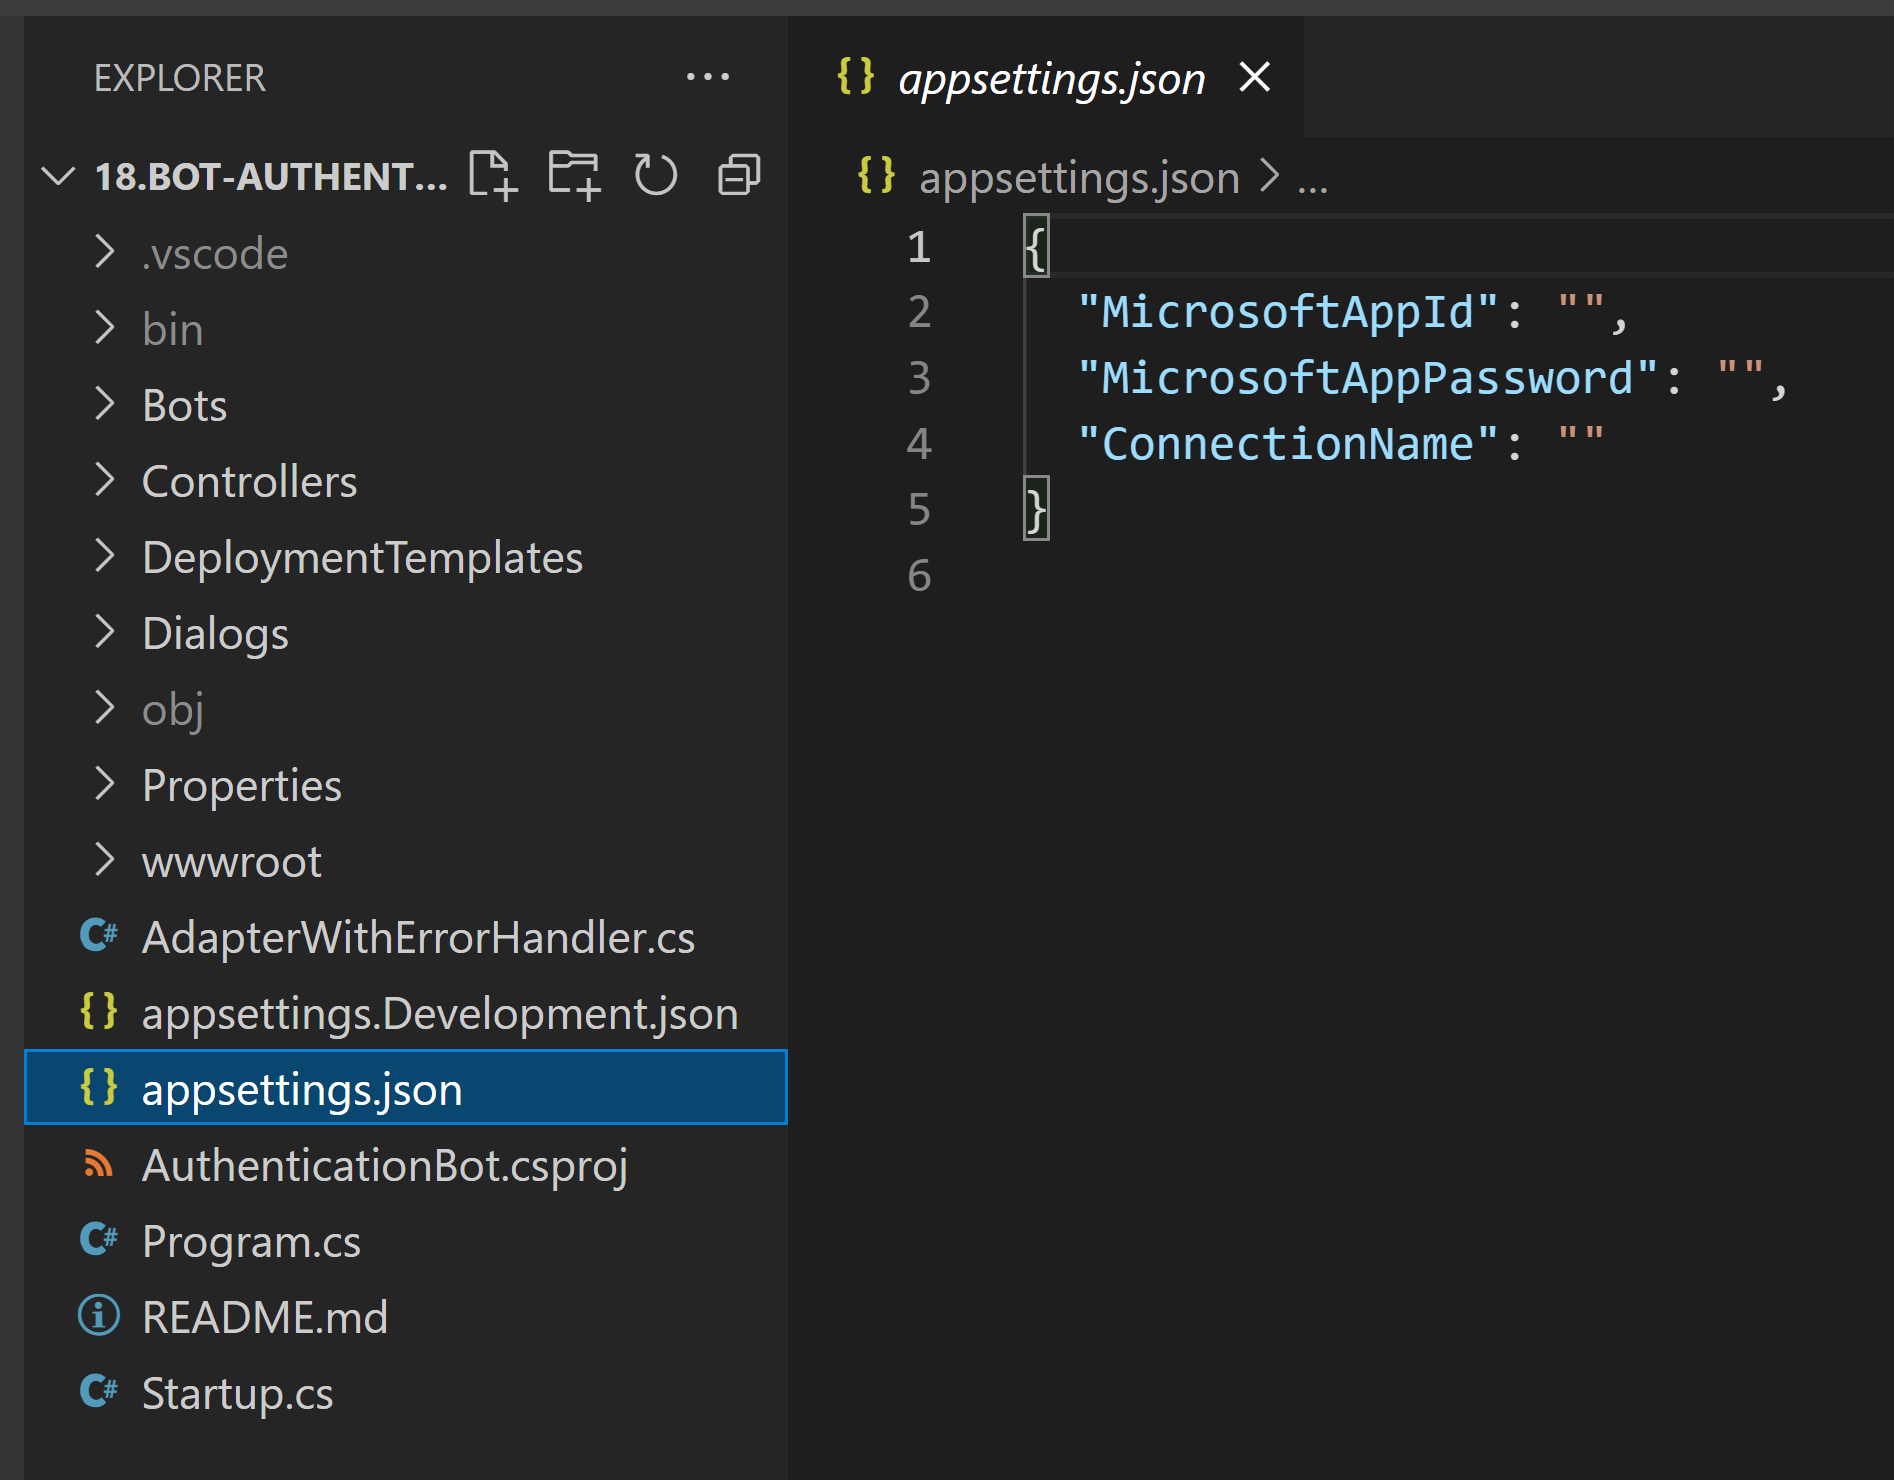
This is done within the Azure Bot Service, so the next step is to create one.
2. Create an Azure Bot Service
We'll create an Azure Bot Service using the Azure Portal as shown below.
Your bot service can be in any compatable region, within any resoruce group and under any valid subscription.
❗Cheat Sheet Time❗
Once we create the Azure Bot Service, we can start adding the following values to our cheatsheet.
(A).1 Bot Name: You can call it what you want. I've called my servicetry-it-dev-bot
(B).1 Microsoft App Id: This is generated for you. You can find it under your bot'sSettingswithinConfiguration.
(B).2 Microsoft App Password: This needs to be generated as shown below.
3. Create an App Integration within Okta
Within the Okta admin portal, we now need to create a new application integration as follows:
Sign-in method: OIDC OpenID Connect
Application type: Web Application
App Integration name: You choose
Grant Type: Authorization Code and Refresh Token
Sign-in redirect URIs: https://token.botframework.com/.auth/web/redirect

❗Cheat Sheet Time❗
Once we create the Application Integration within Okta, we can start adding the following values to our cheatsheet.
(D).1 App integration name: You can call it what you want. I've called my servicetry-it-dev-bot
(D).3 Client ID: This is generated for you. You can find it under your app'sClient Credentialsas shown below.
(D).4 Client Secret: This is generated for you. You can find it under your app'sClient Credentialsas shown below.
4. Get Okta Authorisation Server Settings
Another thing we need to do is to grab the Auth Server details from your Okta Admin Portal.
❗Cheat Sheet Time❗
We can add the following values to our cheatsheet as shown above.
(C).1 Auth Server Issuer Url: You can find this by navigating toAPIunder theSecuritynavigantion menu item. Your URL is listed underIssuer URI'
All other items underOkta Authorization Server Settingsare derived from the aformentioned setting.
5. Add oAuth connection settings to your Azure Bot Service
We now need to add OAuth Connection settings to our Azure Bot Service. We can do so within the Azure Portal as follows:
- Within your Azure Bot, navigate to
SettingswithinConfigurationand clickAdd OAuth Connection settings. - The
Nameis up to you. Once we choose it, we need to update thecheat sheet (A).3. - Set
Service ProvidertoGeneric Oauth 2. - Your
Connection Settingsare as follows:Client id: Use the value from the cheat sheet(D).3 Client IDClient secret: Use the value from the cheat sheet(D).4 Client SecretAuthorization URL: Use the value from the cheat sheet(C).2 Authorization URLToken URL: Use the value from the cheat sheet(C).3 Token URLRefresh URL: Use the value from the cheat sheet(C).4 Refresh URL. Yes, it intentionally is/tokenand not/refresh.Scopes:openid,profile,email,offline_access
6. Configure your code and run it
We now have most of the necessary values in our cheat sheet. We can use those values to configure our code like so:
Now that all configurations have been set, let's run our code!
To run your code, we execute the following dotnet command:
dotnet run
As the code runs, the bot web application is accessible at http://localhost:3978.
We now need to expose the locally running web application to the Azure Bot Service. We do so using ngrok. Let's run the following command to generate a publicly accessible url:
ngrok http 3978 -host-header=localhost:3978
For me, the url generated was https://954b99fc0cb7.ngrok.io.
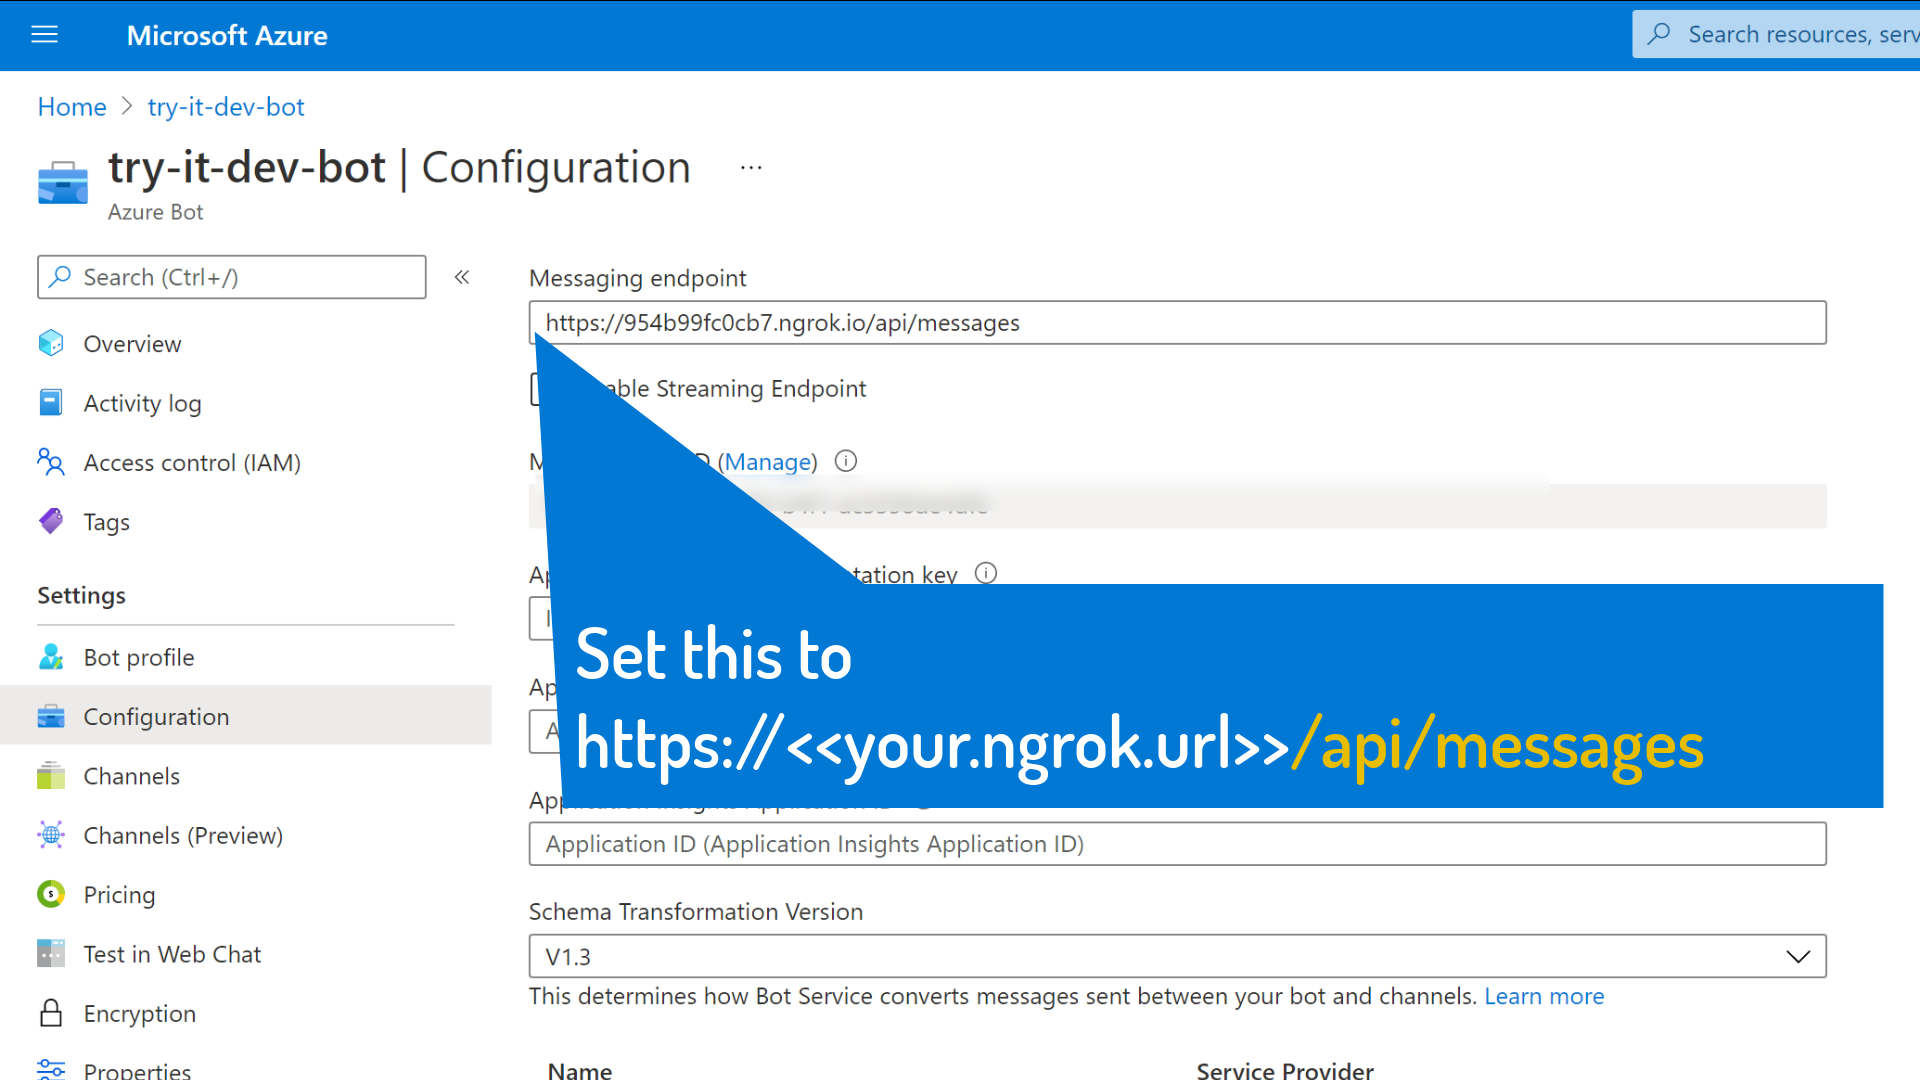
7. Configure your Azure Bot Service and test your bot
We now need to set the Messaging endoint in the Azure Bot Service.
The format of the messaging endoint is as follows:
https://<<URL-GENERATED-BY-NGROK>>/api/messages.
For me this was https://954b99fc0cb7.ngrok.io/api/messages
Once you save your settings, you are now ready to test your bot authentication. You can do so within the Azure Bot Service by navigating to Test In Web Chat. It looks something like so ...

References
 microsoft